How to Set Up the Airbridge SDK: From Signup to Your First Event in 30 Minutes

Signup took two minutes. Now the dashboard is open, the docs are open, and a dozen menu items are staring back at you with zero data behind any of them. This is the moment most setups quietly stall, not because the work is hard, but because the path from "I have an account" to "I can see my first event" is rarely laid out in order.
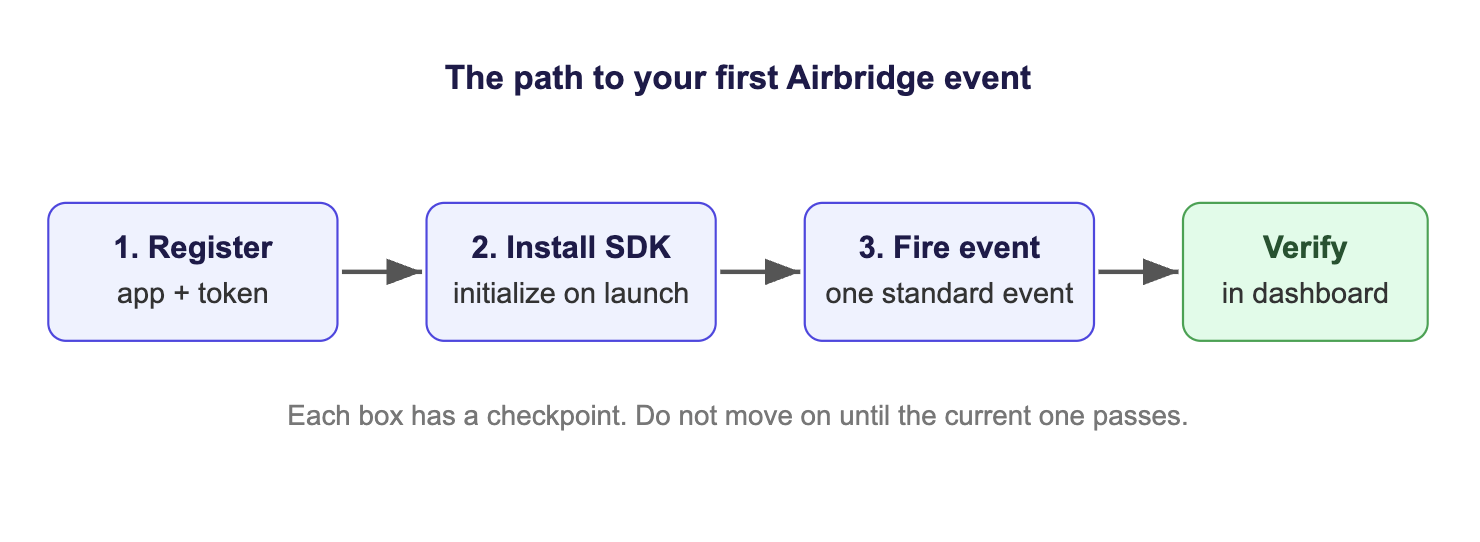
So here is the order. In the next 30 minutes you will register your app, install the Airbridge SDK, and watch a real event land in your dashboard. One verified event is the whole goal. Everything else the platform can do sits on top of that single confirmed signal, and you cannot trust any of it until that signal arrives.
Key Takeaways
-
The work is three steps, not twelve menus. Register the app, install the SDK, then fire and verify one event. Skip nothing, and do them in that order.
-
One credential unlocks the SDK. Your app name and SDK token live under Settings then Tokens, and a single mistyped character is the most common reason a first integration sends nothing.
-
Initialize the SDK before anything else runs. An event that fires before the SDK wakes up is lost, so initialization belongs in your earliest startup code.
-
Verification, not installation, is the finish line. A silent SDK looks identical to a broken one. You are done when the event appears in the testing console, not when the code compiles.
-
The dashboard rewards patience after the proof. Testing tools confirm your event in minutes, but full reports need time to fill before the numbers settle.
Airbridge SDK Setup: What You'll Have in 30 Minutes
Before touching code, fix the target in your head. You are not building a finished marketing stack today. You are proving one thing: that your app can talk to Airbridge and that you can see the conversation happen.
That proof breaks cleanly into three steps. Each one ends with a checkpoint you can verify before moving on, so you never spend 20 minutes debugging step three when the real problem was a typo in step one.
| Step | Minutes | What you do | Checkpoint |
|---|---|---|---|
| 1. Register | 0 to 10 | Add your app, set time zone and currency, copy your SDK token | Your app exists in the dashboard |
| 2. Install | 10 to 25 | Add the SDK to your project and initialize it on launch | The app builds and runs with the SDK live |
| 3. Verify | 25 to 30 | Log one standard event and confirm it in the testing console | Your first event is confirmed |
The realistic clock assumes an app you already build and run locally. According to Airbridge's SDK documentation, an experienced developer needs roughly 10 minutes of SDK work per platform, so a single-platform first pass fits inside half an hour with room to spare. A second platform adds about another 10 minutes, not another 30, because the dashboard side is already done.
Step 1: Register Your App in the Dashboard
It is tempting to jump straight into the SDK. Resist it. The first step is pure dashboard work, and skipping it is why people later find their events landing under the wrong app or their revenue totaled in the wrong currency. Spend ten minutes here and the next twenty go smoothly.
1. Add your app to Airbridge
From the dashboard, create a new app. You give it a name and select the platforms it ships on: iOS, Android, web, or some combination. Two things matter at this step:
-
The app name becomes part of your SDK credentials. Pick something stable and recognizable. Renaming later is possible but creates avoidable friction.
-
Select every platform you actually plan to measure. You can add more later, but setting them now means the dashboard expects the data and you avoid "why is my iOS data missing" confusion on day two.
If any field is unclear, Airbridge's guide to adding an app walks through each one.
2. Set your app time zone and currency
Two settings quietly govern every number you will ever read: the app time zone and the standard currency. Set both before any data flows.
This is not housekeeping you can defer. Both settings decide how events are bucketed by day and how revenue is converted and totaled. Change them after you have history and your old reports and new reports are measured on different rulers, which corrupts every day-over-day and month-over-month comparison you try to make.
-
Time zone: use the one your team actually reads reports in, not necessarily where your servers live.
-
Currency: use the one you report revenue and budget in, so dashboard totals match your finance numbers without mental math.
3. Copy your SDK token from Settings
This is the credential the SDK cannot run without. In the dashboard, go to Settings then Tokens. You will find your app name and your app SDK token there. Copy both into a scratch file you will reach for in the next step.
Watch out: the initialization call fails quietly or throws if either value is off by a single character. A trailing space copied from the dashboard counts as wrong. A mistyped token is, by a wide margin, the most common reason a first integration sends nothing at all, so treat this copy-paste as a precision step, not a formality.
At this point your app exists inside the dashboard, but your codebase still has no idea it exists. The SDK is the bridge between the two, and that is step two.
Step 2: Install the Airbridge SDK and Initialize It on Launch
Now you connect your code. There are native SDKs for Android and iOS plus wrappers for the major cross-platform stacks, and the shape of the work is identical across all of them: add the package, then initialize it once with your app name and token.
1. Add the SDK to your project
You do not need a special toolchain. Use whatever you already use to add dependencies.
| Platform | How you add it | Language |
|---|---|---|
| Android | Gradle dependency (Maven) | Kotlin or Java |
| iOS | Swift Package Manager or CocoaPods | Swift or Objective-C |
| React Native | npm or yarn | JS over native |
| Flutter | pub | Dart over native |
| Expo | npm with the config plugin | JS over native |
The Airbridge SDK Quickstart lists the exact package name and current version for each platform, so pull the version string from there rather than guessing.
2. Initialize the SDK on app launch
Initialization is a single call. Where you put that call matters more than the call itself: it has to run before any event could fire, which means your earliest startup path.
On Android, that is your Application.onCreate():
// Application.onCreate()
val option = AirbridgeOptionBuilder("YOUR_APP_NAME", "YOUR_APP_SDK_TOKEN")
    .build()
Airbridge.initializeSDK(this, option)
On iOS, that is application(_:didFinishLaunchingWithOptions:):
// AppDelegate
let option = AirbridgeOptionBuilder(name: "YOUR_APP_NAME", token: "YOUR_APP_SDK_TOKEN").build()
Airbridge.initializeSDK(option: option)
Replace YOUR_APP_NAME and YOUR_APP_SDK_TOKEN with the values from Settings then Tokens. Build and run once. If the app launches without crashing, the bridge is standing.
Why the placement is strict: the SDK can only record an event after it is awake. If initializeSDK runs inside a screen that loads later, every event fired before that screen is simply gone, and you will burn time hunting a "missing event" bug that is really a "too-late initialization" bug.
3. Configure the iOS ATT prompt (iOS only)
If you run paid campaigns on iOS, attribution depends on the device advertising identifier, and that identifier requires user permission through Apple's App Tracking Transparency prompt. Two pieces are involved:
-
Show the ATT prompt so the user can grant or deny tracking.
-
Set a collection timeout in the SDK so the identifier is captured once the user responds. Airbridge's onboarding guide recommends a timeout of 30 seconds or longer, depending on how quickly your onboarding reaches the prompt.
You can skip this for your very first test event. You cannot skip it before launching iOS, because without it your paid attribution runs blind on Apple devices. For the concept and why it matters, see Airbridge's App Tracking Transparency glossary entry.
Checkpoint before step three: the app builds, runs, and does not crash on launch with the SDK initialized. If that holds, you are ready to fire an event.
Start measuring what matters — for free
Airbridge Core Plan gives growing teams real attribution, deep linking, and audience tools at no cost.
Get Started Free →Step 3: Track Your First Event and Verify It in the Dashboard
An installed SDK that has never sent an event is indistinguishable from one that is broken. Installation is not the finish line. Verification is. The last five minutes are about firing one deliberate event and watching it arrive.
1. Pick the right first event to track
Core Plan ships with 25 standard events that come with predefined names and schemas. Using a standard event means the naming and structure work is already done, so you log immediately instead of designing an event taxonomy on day one. This is exactly how to set up the Airbridge SDK and fire your first event without getting stuck on schema decisions.
For a subscription app, fire the event that maps to the moment that actually matters. Each event answers a distinct business question:
| Funnel stage | Standard event | Event ID | The question it answers |
|---|---|---|---|
| Acquisition | Sign-up | airbridge.user.signup | How many installs become accounts? |
| Activation | Complete Tutorial | airbridge.completeTutorial | How many reach the "aha" moment? |
| Trial | Start Trial | airbridge.startTrial | How many enter the paid funnel? |
| Revenue | Subscribe | airbridge.subscribe | How many turn into recurring revenue? |
| Churn | Unsubscribe | airbridge.unsubscribe | Where is revenue leaking back out? |
Subscribe is the most meaningful first event for a subscription app, but for a smoke test, any standard event proves the pipe. Most first integrations will not have a working subscription flow on day one, so Sign-up or Complete Tutorial is usually faster to trigger and just as valid for confirming that data flows. Pick whichever you can fire right now.
2. Log the event from a real user action
Send the event with a single call. On Android:
// Fire on the actual subscribe action, or a temporary test button
Airbridge.trackEvent("airbridge.subscribe")
Wire that call to a real action in your app. The actual subscribe button is ideal because it tests the exact code path you care about. If that flow is not ready, a temporary test button works fine for verification. Run the app and trigger it.
3. Verify the event in the SDK testing console
Open the SDK testing tools in your dashboard and watch for the event to arrive. Real-time testing surfaces the event within a minute or two, which confirms the full path end to end: your code fired it, the SDK transmitted it, and the dashboard received it. Airbridge's SDK testing guide shows exactly where to look.
When you see your event in the console, you have hit the goal. The connection is confirmed.
Set the right expectation for reports: the testing console shows your event almost immediately, but the polished reports, retention, revenue, and funnel, need time to accumulate before the numbers stabilize. Airbridge's onboarding documentation notes that data collection takes roughly 24 to 48 hours to settle into trustworthy reporting. An empty Revenue report on day one is normal and means nothing. Judge your setup by the event you just verified in testing, not by a report that has not had time to fill.
4. Troubleshoot a missing first event
Most first-event failures come from a short list of repeatable causes. Work down this table before assuming anything deeper is wrong.
| Symptom | Most likely cause | Fix |
|---|---|---|
| Nothing appears in the testing console | Wrong or mistyped token | Re-copy app name and token from Settings then Tokens, character for character |
| SDK initialized but no events log | Initialization runs too late | Move initializeSDK to your earliest startup code |
| Event shows under a different app | Token belongs to another app record | Match the token in code to the app you are watching |
| iOS shows no device or ad identifier | ATT prompt missing or declined | Add the ATT prompt and set the collection timeout |
| Testing works, but reports are empty | Reports lag behind testing | Wait for data to settle, then re-check |
If you have checked all five and the event still will not appear, the issue is usually environment-specific (a proxy, an ad blocker on a test device, or a build that did not pick up the new dependency). Rebuild clean and test on a real device on a normal network before going deeper.
After Your First Event: Connect Ad Spend to Subscriptions
A verified event proves the plumbing. It is not why you set up tracking in the first place. You did that to answer the question that decides where your money goes: which of your campaigns produced that subscribe, and which ones only produced installs that never paid?
This is where the rest of the setup earns its keep, and the order continues to matter.
1. What to set up next, in order
-
Connect your ad channels. Core Plan focuses on the four channels most subscription apps actually spend on: Meta, Google, Apple Search Ads, and TikTok. Connecting them lets Airbridge tie each subscriber back to the campaign that drove them.
-
Confirm your attribution settings. Decide the windows and rules that match how your buying cycle actually works, so credit lands where it belongs.
-
Add your subscription funnel events. You verified one event. Now instrument Sign-up, Start Trial, Subscribe, and Unsubscribe so the full funnel is visible, not just the endpoint. The subscription event tracking guide covers the complete sequence.
-
Let data accumulate, then read the reports. After a day or two, the funnel, retention, and revenue reports become trustworthy enough to act on.
2. Why connecting spend to revenue is worth it
The gap between an average subscription app and a strong one is large, and it is mostly a measurement problem. According to RevenueCat's State of Subscription Apps 2025, the median subscription app converts just 1.9% of downloads to paying subscribers within 35 days, while the top 10% of apps reach 8.5%. That is a 4.5x gap, and you cannot close it on instinct. You close it by seeing which channels deliver the users who actually subscribe, then moving budget toward them, which is impossible when your ad spend and your subscription data live in separate systems that never talk.
3. What Core Plan does and does not do
Core Plan is deliberately scoped for early-stage subscription apps, and it is honest about its edges rather than promising everything:
-
It gives you 25 standard events, not custom events. Custom events require the Growth plan. For most early subscription funnels, the standard set is enough.
-
It connects up to two third-party platforms, such as RevenueCat or Adapty, not an unlimited list.
-
It covers four self-attributing networks, the channels above, not every niche ad network.
That narrower scope is the point. Fewer decisions during setup is exactly why your first thirty minutes can stay thirty minutes.
| Setup factor | Enterprise MMP | Airbridge Core Plan |
|---|---|---|
| Pricing entry | Annual contract, sales call | Pay-as-you-go, 15K free attributed installs |
| Billing integrations | Native, often in higher tiers | RevenueCat and Adapty in the base plan |
| Events | Predefined plus custom | 25 subscription-optimized standard events |
| Onboarding | General-purpose | Subscription-app focused |
Start Seeing Which Channels Drive Paying Subscribers
The hardest part of any new tool is the first proof that it actually works, and you now have it: a real event, fired from your app, confirmed in your dashboard. Everything else, channels, attribution, and reports, compounds on top of the pipe you just built in half an hour.
The next move is to point that pipe at the question that pays for itself. If you are ready to see which channels actually drive paying subscribers and not just installs, start free with Airbridge Core Plan, which includes 15K attributed installs.


Ready to see what Core Plan can do?
Free attribution, deep linking, and audience tools — built for teams that are ready to grow.